
Kitchen Renovation Order of Work
Strip to fit-off in the right order – so nothing gets installed twice
Quick answer
The kitchen renovation order of work – strip-out to fit-off in the right sequence, with stage timelines and a survival-kitchen plan.
14 min read
On this page
Kitchen renovation steps in South Africa can make or break the value you add to your home. How do you plan a build that stays on budget and delivers lasting value?
On our platform, buildingpricessouthafrica.co.za, we offer clear pricing guidance so you can compare options and request quotes. Typical projects take between 4 and 12 weeks, depending on site complexity and access.
Costs hinge on material choices, labour rates and specific site access requirements. Knowing the correct order of work and a sensible budget is the best way to avoid delays and extra cost.

Use our pricing guidance to understand how finishes and labour affect total cost and to connect with independent contractors for tailored quotes. Proper planning is the simplest way to secure value from your new kitchen project.
Planning Your Kitchen Renovation Journey
A clear vision board makes it easy to explain design choices to a designer and to compare costed options. Use images, material swatches and short notes to capture your preferred layout, storage and overall design for the space.

Creating a Vision Board
Collect photos of layouts, cabinetry and islands that match your taste. Add fabric and finish swatches so you can compare cost and durability.
Our pricing guidance helps turn those ideas into realistic budgets before you request quotes.
Must-haves versus Nice-to-haves
List essentials first: efficient storage, a workable layout and durable finishes. Then add nice-to-haves such as a kitchen island or premium appliances.
“Prioritising must-haves keeps the budget steady and prevents late changes that add cost.”
- Define how the space must function for daily life.
- Check storage options early; poor storage design creates wasted expense later.
- Use a designer to test layout options and to refine costed alternatives.
| Decision | Impact on Cost | When to Decide |
|---|---|---|
| Storage layout | Medium | At plan stage |
| Island or no island | High | Before ordering units |
| Finish level (standard/premium) | High | When costing options |
Establishing a Realistic Budget and Scope
Start by setting a realistic budget that ties directly to your preferred layout and finish level.
Costs vary. Independent fitters typically charge between R1,500 and R3,000 per day. High-quality composite worktops can be about R4,000 per linear metre.
Use those figures to test affordability before you finalise design choices. Our quote request process helps you compare independent contractors and written prices.
- Account for labour, appliances, plumbing and electrical work.
- Factor in custom cabinetry and premium storage if you’re after a dream kitchen.
- Confirm scope, timelines and final cost in writing with your chosen contractor.

| Element | Typical Cost | When to Decide |
|---|---|---|
| Fitter labour (per day) | R1,500–R3,000 | During tendering |
| Composite worktop (per m) | ~R4,000 | At specification |
| Appliances & services | Variable — plan allowance | When finalising layout |
“A clear budget prevents late changes that add cost.”
Practical way forward: set a firm budget, use our platform to research options, then request quotes so your project runs to time and cost.
Essential Kitchen Renovation Steps for South African Homes
Sequence matters: get the main services in place before you fit cabinets and tops.

Begin with a full strip-out of old units, tiles and damaged walls so the space is clear for services and structural checks.
Next, install plumbing and electrical work to suit your new layout. Budget for new lighting and earth-leakage-protected outlets near the sink.
Once services are signed off, lay flooring or prepare walls depending on your chosen materials. Proper sequencing avoids rework and extra cost.
- Fit cabinetry and doors after surfaces are stable.
- Install tops, sinks and fixtures before final lighting fit-off.
- Allow time for paint, final trims and snagging.
Pricing factors: labour, materials, access and custom storage add to cost. Use our platform to compare quotes and confirm scope in writing.
| Phase | What to budget for | When to decide |
|---|---|---|
| Strip-out | Demolition, waste removal | Before contractor start |
| Services | Plumbing, electrical, lights | During design and planning |
| Finishes & fit-off | Tiles, tops, fixtures, snagging | Before final handover |
Preparing Your Property for Construction
Organising a temporary service area is a practical first move before contractors arrive. This lets you keep cooking and daily routines going while the main room is unusable.
Temporary kitchen setup
Designate a single room or utility area for a portable hob, microwave, and small fridge. Include a table for prep and a bin for daily waste.
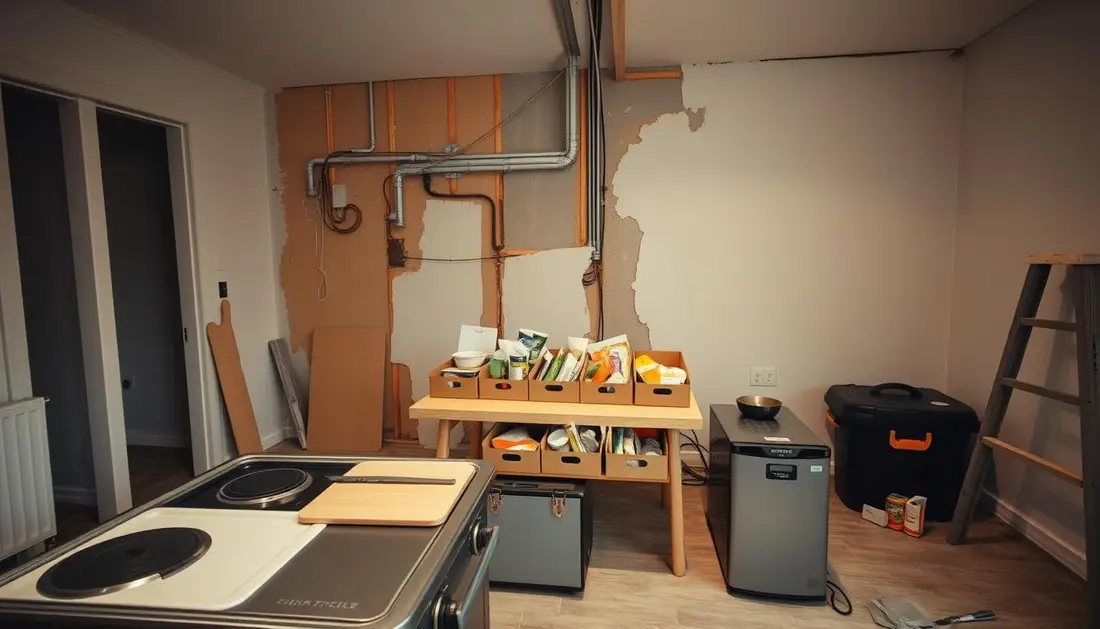
Make sure you have a space for the sink and appliances if you plan to keep water access. Confirm with your contractor which services remain live.
“Turn off utilities before demolition — it keeps everyone safe and avoids costly accidents.”
Protect the house from dust by sealing doors and covering floors. Consider hiring a dumpster for tiles, walls and discarded units; this saves multiple trips and speeds the project.
- Store new materials, doors and fixtures in a dry, accessible area prior to fitting.
- Agree in writing that plumbing and electrical services are disconnected before any strip-out.
- Plan where appliances and the temporary sink will sit to reduce wasted time and cost.
Pricing note: account for small rental and waste costs in your budget — these preparations help the project run faster and cleaner.
Demolition and Initial Site Preparation
Demolition marks the point where plans become physical work and the site is prepared for new systems.
What we recommend: remove old cabinets, doors, flooring and damaged walls first so the room is safe and clear for trades.
Confirm your contractor holds a waste carrier licence or agree skip hire costs up front. That avoids delays and hidden waste charges that push the project over budget.
Structural framing and any wall alterations must be finished before new fixtures are ordered. Always check permits for structural or plumbing changes.
- Have plumbing and electrical rough-ins tested and signed off before closing up walls or laying flooring.
- Keep the space clean and secured; organised work saves time and reduces snagging.
- Factor initial labour, disposal and inspection fees into your budget for an accurate cost picture.
“Rough-in inspections are the gateway to a trouble-free fit-off — don’t skip them.”
Installing Services and Structural Elements
Getting services right early reduces delays and prevents costly rework later in the project. This phase fixes where power, plumbing and structural supports sit so cabinets, doors and lighting align correctly.
Electrical Safety Standards
All countertop outlets must have earth leakage protection to meet current safety rules. Electricians commonly charge between R1,500–R2,800 per day for kitchen service work. Ask for certificates on completion.
If you plan an appliance garage, make sure the electrician fits a relay device — it is not legal to have live sockets inside closed cabinetry.
Plumbing Requirements
Plumbers charge roughly R350–R650 per hour for service installations. Proper plumbing for the sink and appliances secures long‑term function for your home.
Test all water and waste runs and obtain sign‑off before you apply final flooring or wall finishes. This avoids breaking finished surfaces to correct faults later.
“Coordinate services early, and always request certification from trades to confirm compliance.”
| Service | Typical Cost | When to Confirm |
|---|---|---|
| Electrical (day rate) | R1,500–R2,800 | Before rough‑in |
| Plumbing (hourly) | R350–R650 | During layout approval |
| Earth leakage & relay devices | Included in service cost | At specification stage |
Practical tip: use our platform to get accurate quotes for your kitchen renovation project. Confirm scope, time and certification in writing so the fit‑off and final snagging run smoothly.
Cabinetry and Worktop Installation
Accurate cabinet fixing makes or breaks the fit of your tops and the final look.
Cabinetry installation is the heart of a successful kitchen remodel. Base carcasses must sit square, level and fixed to the wall and floor before any templating occurs.
Templating Worktops
Worktop templating can only happen after the base cabinets are fully installed. This dependency prevents costly re‑cuts and ensures precise cut‑outs for the sink and appliances.
- Material cost: laminate starts from R450/m; composite options can be ~R4,000/m and alter the overall cost significantly.
- Fitters must coordinate sink and appliance locations so cut‑outs match on the day of templating.
- Protect new flooring while heavy cabinets and tops are moved into place.
“Template only after carcasses are complete — it saves time and money.”
| Item | Typical price | When to confirm |
|---|---|---|
| Laminate worktop | From R450/m | At specification |
| Composite/granite | ~R4,000/m | Before templating |
| Sink/appliance cut-outs | Included in fitter cost | On templating day |
Practical tip: use our platform to compare flat‑pack and bespoke cabinets and request quotes so you can balance cost, materials and design for your space.
Final Fit-off and Painting
This last phase ties the work together: appliances are connected, hardware fitted and paint applied.
What to expect: we connect and test each appliance, fit handles and align cabinets so doors and drawers close correctly.
Paint gives the room its final look. Use trades who understand durable paints suitable for the flooring and work surfaces.
- Check appliance connections and level fittings for safe, efficient operation.
- Confirm hardware is tight and cabinetry gaps are adjusted before paint touch-ups.
- Arrange a professional clean to remove dust and construction debris.
“A deep clean lets you use your new room straight away and keeps finishes pristine.”
| Final Task | Why it matters | Who provides it |
|---|---|---|
| Appliance connection & testing | Safety and performance | Qualified installer |
| Hardware adjustment | Function and finish | Fitter/carpenter |
| Painting & sealing | Durability and look | Professional painter |
| Professional clean | Ready for daily use | Cleaning contractor |
How we help: we connect you with local professionals for the final fit-off and the clean so your kitchen remodel is ready to style and enjoy.
Managing the Snagging Process
The snagging walk-through is your last chance to make sure everything functions correctly.
Do a staged inspection: check cabinets and carcasses, confirm appliance connections, and review paint and seals. Walk the space with your contractor and note every minor defect.
Keep a written snag list. Include cabinet alignment, appliance hookups, sink and worktop seals, paint touch-ups and flooring joins. Ask for completion dates in writing before final payment.
Record warranties and manuals for all appliances and fittings. Store them with your handover documents. This helps with future guarantees and maintenance.
“A thorough snag list protects your money and ensures lasting quality.”
| Stage | Common Snags | Who Fixes |
|---|---|---|
| Cabinet fit | Doors misaligned, gaps | Carpenter / fitter |
| Services & appliances | Loose connections, leaks | Plumber / electrician |
| Finishes | Paint blemishes, sealing | Painter / contractor |
Final note: make sure all snag items are confirmed in writing. A clear handover ensures your kitchen renovation is finished to standard and adds value to the home.
Ensuring Quality and Warranty Compliance
Record timelines, payment milestones and warranties in writing so there are no surprises. A clear paper trail protects your home and the value of the project.
Always request official certificates for plumbing and electrical work. These documents confirm compliance with local safety rules and make future sales or insurance queries simpler.
Keep a tidy file of appliance manuals and warranties. If a hob, oven or other appliance fails, fast access to the paperwork speeds repairs and claims.
- Confirm inclusions & exclusions in writing so the scope and cost are clear.
- Agree payment schedules tied to milestones, not arbitrary dates.
- Store certificates for plumbing and electrical work with guarantees.
- Archive cabinet and appliance warranties and instruction booklets for future maintenance.
| Item | Why it matters | Who provides |
|---|---|---|
| Certificates | Legal safety proof | Electrician / Plumber |
| Warranties | Repair and replacement cover | Manufacturer / Supplier |
| Written scope | Prevents disputes | Contractor |
“A documented process and kept warranties give you peace of mind and protect your investment.”
Maximising Value Through Professional Guidance
Professional guidance turns complex site work into a predictable, cost‑effective process.
Use our platform to compare realistic prices and confirm scope before any physical work begins. Our pricing guidance helps you weigh labour, materials and access costs so you make informed choices that add value.
Request quotes through buildingpricessouthafrica.co.za to connect with independent contractors who understand local rules and can handle the technical work.
Visit our platform to compare quotes, protect your budget and find the right team for your specific space. This single, straightforward step reduces surprises and speeds completion.
Run your numbers against kitchen renovation costs.
FAQ
What is the correct order of work from strip-out to final fit-off?
Start with planning and permits, then set up a temporary kitchen and protect the rest of the house. Carry out demolition and waste removal, followed by structural changes and service installations (electrical, plumbing and gas). Next install subfloors, wall finishes and cabinetry carcasses, then worktops and appliances. Finish with painting, final plumbing and electrical fit-off, floors and snagging before handover.
How do we create a practical vision board for the project?
Collect images of layouts, finishes, materials and appliances you like. Add dimensions, a simple layout sketch and notes on must-have storage or an island. Use this to brief your designer or contractor so everyone understands style, function and priorities before costing begins.
How should we decide must-haves versus nice-to-haves?
Prioritise items that affect safety, workflow and core functionality — sinks, hob position, storage and durable floors. Treat cosmetic upgrades and optional appliances as later additions if the budget tightens. List your priorities and assign rough costs to guide compromise decisions.
How do we set a realistic budget and scope for a South African remodel?
Base the budget on scope: full strip-and-refit, partial update or cosmetic refresh. Include labour, materials, appliances, permits, waste removal and a contingency of 10–20%. Get itemised quotes from at least two contractors and confirm timelines and payment milestones in writing.
What site preparations are needed before builders arrive?
Clear the room and nearby spaces, protect adjacent floors and furniture with dust sheeting, and ensure easy access for trades and deliveries. Arrange storage for salvaged items and confirm parking or lift access for contractors. Notify your insurer and neighbours if work is noisy.
How do we set up a temporary kitchen during works?
Identify a nearby room with power and water access. Use a kettle, microwave, portable induction hob and a small fridge. Keep crockery and essentials in a labelled box. This reduces disruption and keeps health and safety in mind during longer projects.
What should we expect during demolition and initial site preparation?
Expect dust, noise and waste removal. Demolition includes removing cupboards, tiles, plasterboard and old services. Contractors will check for hidden issues such as rot, asbestos or structural faults and report variations before continuing.
When should electrical and plumbing installations be done?
After structural changes and before cabinetry is fixed. Electrical circuits, lighting, outlets and extractor fans must be roughed in and inspected. Plumbing for sinks, dishwashers and gas hobs should be installed and pressure-tested prior to wall finishes and cabinet installation.
What electrical safety standards and certificates apply in South Africa?
Installations must comply with SANS 10142. A registered electrician should supply an electrical compliance certificate (COC) on completion. Confirm the electrician is registered with a recognised body and request references for similar projects.
What plumbing requirements should we confirm in writing?
Agree on piping materials, pressure testing, waste connections and taps. Ensure that backflow prevention and hot-water connections meet local bylaws. Ask for a written scope that covers guarantees, who sources fittings, and who handles municipal approvals if required. This pairs naturally with kitchen cupboard materials.
When do we template and install worktops?
Template after cabinets are fully installed and level. The template ensures accurate cut-outs for sinks, hob cut-outs and overhangs. Worktops should be fitted before appliances are permanently plumbed and final splashbacks are installed.
What is involved in the final fit-off and painting stage?
Final fit-off includes attaching doors and handles, connecting appliances, completing electrical switches and fitting trim. Painting is best done after dust from major works settles. Use low-VOC paints and allow sufficient drying time before returning belongings.
How do we manage the snagging process effectively?
Compile a snag list with photos and agreed completion dates. Walk through with your contractor, prioritise safety and functional defects, and keep small cosmetic items for final touch-ups. Hold back a retention payment until all agreed snags are resolved.
How can we ensure quality and warranty compliance?
Use reputable suppliers and registered tradespeople. Get written guarantees for workmanship and product warranties. Check appliance warranties from brands like Bosch or Defy and store paperwork in a dedicated folder. Confirm warranty terms for concealed items and who is responsible for follow-up work.
When should we bring in a professional designer or project manager?
Engage a designer for layout optimisation, material selection and to avoid costly mistakes. Use a project manager when scope, multiple trades or strict timelines require coordination. Their fees often save money through better procurement and fewer delays.
What cost factors most influence the total price?
Labour rates, materials (stone worktops, cabinetry finishes), appliances, plumbing and electrical upgrades, structural changes, access and waste removal. Region, site complexity and approvals also affect cost. Confirm payment schedule, scope and allowances in writing. It reads well alongside granite vs engineered stone countertops.
How do we maximise value from this project?
Focus on durable finishes, efficient layout, and storage solutions. Invest in good lighting and reliable appliances rather than purely aesthetic upgrades. Get up to three quotes from independent contractors, compare itemised costs and verify references before hiring.
Ready to compare?