
Skimming vs Plastering
A 3 mm refresh or a 12 mm rebuild – matching the fix to the wall
Quick answer
Skimming vs plastering – what each involves, when a skim is enough, and when only full plaster will actually save the wall.
10 min read
On this page
Which finish will give your walls a lasting, cost‑effective look? This question matters if you plan a renovation in South Africa and want clear pricing before you request quotes.
We explain the core difference simply. Plastering is a thicker application that builds or repairs walls and covers brickwork. A final skim coat creates a smooth surface ready for paint or paper.
Skimming is a thin coat used as a finishing step. It evens out minor defects and gives a clean finish. Proper surface preparation is the foundation for a lasting result.
Our guide on buildingpricessouthafrica.co.za covers the plastering skimming process, cost factors and what to confirm in writing before you hire a contractor. Use it to compare quotes and avoid common pitfalls.

Understanding the Skim vs Plaster Distinction
Picking between a full build-up and a finishing layer starts with your wall condition. The choice affects cost, time and the final appearance of your room.
Defining plastering
Plastering is a construction technique that builds a durable surface over brickwork or lath.
The process uses multiple layers to level uneven walls and to create a strong base for decorating.
Defining skimming
Skimming is a thin 2–3mm layer applied as the last step to achieve a smooth surface.
It hides small imperfections and readies walls ceilings for painting wallpapering or further finishing.
- Plastering creates structure and corrects major defects.
- Skimming refines the final appearance and gives a smooth finish for paint or paper.
- Thickness and the application step are the main differences between the two methods.

| Feature | Plastering | Skimming | Best for |
|---|---|---|---|
| Layer thickness | Several mm to build up | 2–3mm thin layer | New walls / major repairs |
| Primary aim | Structural, durable surface | Smooth finish for decorating | Preparing for paint or wallpaper |
| Typical outcome | Even, strong surface ready for final coats | Flush, paint-ready smooth surface | Refreshed interior walls |
Assessing Your Wall Condition Before Starting
Before you start work, inspect each wall to confirm whether it needs repair or only a finishing coat. A proper check saves time and avoids throwing materials at the wrong problem.
Identifying Hollow Spots
Tap and listen. Hollow sounds usually mean the existing plaster has lost bonding to the brick or board behind it.
- Mark hollow areas for removal or local repairs.
- If hollows are widespread, a full plastering repair is safer than multiple small fixes.
Detecting Friable Plaster
Crumbling or powdery surfaces show friable plaster. Any new skim coat will fail if the base material is unstable.
Remove loose material and assess the remaining surface before you plan skim coats or a skim coat application.

Managing Damp Issues
Water and damp must be cured before you add new finishes. Moisture prevents proper bonding and leads to failed coats.
Allow enough drying time after repairs. Identify cracks in walls and ceilings that let water in and fix them first.
Our platform stresses that the condition of your existing plaster determines the success of the project. Check bonding, remove friable areas and resolve damp before you proceed.
The Technical Process of Plastering and Skimming
The right technique combines measured thickness, correct tools and drying time to deliver a durable surface.
Plastering involves multiple layers of sand, cement and water to build a strong wall. Each coat must be applied with even thickness so the final surface resists cracking and wear.
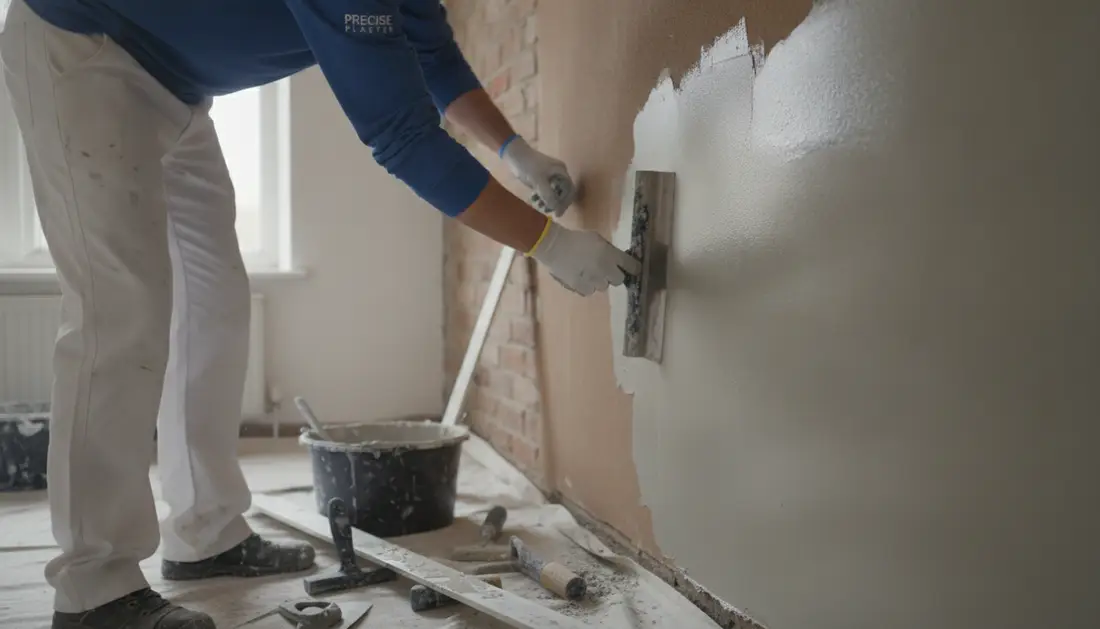
The skimming step uses a thin layer of 2–3mm applied with a professional trowel to achieve smooth walls. Mix materials to a lump‑free consistency before application.
- Apply base coats and allow adequate drying time — plastering can take three to five days to dry between coats.
- Use a float to remove ridges and to produce a smooth finish; control thickness on every layer.
- Allow a skim coat 24–48 hours to dry before further finishing or painting.
Follow each step carefully: correct mixing, careful application and proper drying time reduce failures caused by water or trapped moisture. The complexity of this process affects labour and materials, so expect this to influence cost when you request quotes.
Why Surface Preparation Determines Project Success
Good surface preparation is the single biggest factor that decides whether a wall job lasts or fails. Start by checking the condition of the existing plaster and any paint finishes before you commit to work.
Skimming over unstable material carries high risk. If the base is loose, the new skim coat will peel with the old layer and the entire application will fail.

The Risks of Skimming Over Poor Surfaces
You must remove flaking paint and any friable material to secure correct bonding to the wall. Failure to do this often leads to detachment and repeat repairs.
Use a suitable bonding agent when applying a new coat to painted or imperfect surfaces. This ensures the new layer adheres correctly to existing plaster and paint.
- Remove loose material before any application to prevent early failure.
- Address cracks and defects — small repairs now avoid large costs later.
- Mist coat recommendation: a diluted paint seal improves adhesion for final painting and decorating.
Our platform recommends treating surface preparation as non‑negotiable. Proper prep extends the life of plastering work and protects your renovation budget.
Navigating Costs and Value for Your Renovation
Our pricing guidance at buildingpricessouthafrica.co.za helps you budget for plastering and skimming work with clear local insight.
Prices depend on scope, site access, region, materials and labour. Hidden water damage or poor wall conditions add time and cost.
Always ask contractors to confirm inclusions, exclusions, timelines, payment terms and warranties in writing. This protects your investment and avoids disputes.
- Compare multiple quotes to check value and to spot low bids that cut corners.
- High-quality materials and professional labour cost more but give a longer-lasting finish and fewer repairs.
- Our platform connects you with independent contractors for accurate on-site assessments.
| Cost Factor | What it affects | Typical impact | What to confirm |
|---|---|---|---|
| Wall condition | Labour & extra repairs | Medium–high | Scope of repairs included |
| Materials | Durability of finish | Low–medium | Brand/specification listed |
| Access & region | Time and transport | Variable | Site access fees and timelines |
| Coats & drying time | Project duration | Medium | Number of coats and cure times |
Finalising Your Approach to Wall Finishing
Decide on a finish based on the extent of repairs, desired appearance and long‑term value. If the surface is stable, a thin skim coat gives a smooth finish ready for painting or wallpaper. For major defects, choose a full plastering repair to rebuild strength before the final coat.
Prepare surfaces correctly: remove loose material, cure any water issues and use quality materials to protect bonding and appearance. Allow the recommended drying time between coats to avoid failures.
Confirm scope, timelines and warranties in writing with your contractor. Use our platform to request quotes and compare independent pros for each room. Follow these steps and your walls and ceilings will stay durable and attractive for years.
Price it up from plastering cost per square metre. For what this typically costs, see plastering per square metre price guide.
FAQ
What’s the main difference between skimming and plastering?
Plastering applies a thicker base coat to level rough masonry or brickwork and correct deep defects. Skimming is a thin finishing coat that creates a smooth surface over an existing sound plaster or cement render. Choose plastering when walls are uneven or have missing render; choose skimming when the surface is generally flat and just needs a fine finish before painting or wallpapering.
How do I know if a wall needs full plastering or only a skim coat?
Check for deep cracks, large hollows, exposed brick, loose or friable render, and significant unevenness. Tap the wall: a hollow sound, widespread powdering or crumbling, or damp stains usually mean you need new plaster. If the surface is solid, reasonably level and only has minor defects, a thin skim coat will usually be sufficient. This pairs naturally with brick types south africa.
Can you skim over old plaster or must it be removed first?
You can skim over old plaster if it’s firmly bonded, not powdery, and free of mould and rising damp. Remove any loose plaster, treat and repair friable areas, and prime porous surfaces. If large patches are hollow or the plaster is delaminating, strip those sections and replaster before skimming.
How thick is a typical skim coat compared with a plaster coat?
A skim coat is generally 1–3 mm thick and designed to provide a smooth final finish. A plaster coat (first or base coats) can range from 10 mm to 20 mm or more, depending on level correction needed. Multiple plaster layers are common: a scratch coat and a floating coat before any finishing skim.
How long does each process take before you can paint?
Drying times vary with thickness, material and climate. A thin skim coat can be ready for painting in 3–7 days under normal South African indoor conditions. Full plaster layers need longer — often 7–21 days per layer to dry sufficiently. Always confirm dryness with a moisture meter or by touch before painting.
What materials and tools are used for skimming and plastering?
Skimming uses ready-mixed finishing plaster like PVA-bonded skim products or gypsum-based compounds, plus trowels, plastering hawks, sandpaper and primers. Plastering uses cement-sand or gypsum plaster mixes, bonding agents, render mesh for large areas, straight edges, and floats. Proper tools and correct mixes affect finish quality and adhesion. This pairs naturally with brickwork quality checks.
Are there risks when skimming over painted or wallpapered walls?
Yes. Paint that’s glossy or poorly bonded and existing wallpaper can prevent adhesion. Remove loose paint and paper, sand glossy finishes, and apply the correct primer or bonding slurry before skimming. For wallpapered walls it’s safer to strip paper first and deal with any adhesive residues.
Will a skim coat hide hairline cracks?
A good skim coat can hide hairline cracks temporarily, but it won’t fix underlying movement or structural cracks. For recurring cracks you’ll need to stabilise the cause, use joint tape or render mesh and apply appropriate repair coats before skimming to prevent reappearance.
How much should I budget for skimming vs replastering per square metre in South Africa?
Costs depend on location, access, surface condition, and finish. As a rough guide: expect lower rates per square metre for skimming than for full replastering. Labour, materials, priming and finishing add to the total. Request up to 3 independent quotes (or up to 5 where available) from local contractors and confirm scope, drying time and guarantees in writing. It reads well alongside bricks per square metre.
Can I paint directly after skimming or do I need a primer?
Apply a PVA or primer-sealer after the skim has fully dried and been lightly sanded. Primer ensures uniform absorption and improves paint adhesion. Skimmed gypsum surfaces often require a specific primer before emulsion or oil-based paints.
What preparation should I do before a tradesperson arrives?
Clear furniture, remove picture hooks and fixings, protect floors and fittings, and ensure good ventilation. Point out damp, prior repairs or problem areas. Confirm working hours, dust control methods and who disposes of waste.
Can skimming or plastering be done on ceilings as well as walls?
Yes. Ceilings can be skimmed or plastered. Ceilings often need more careful support, and multiple coats may be necessary to avoid sagging. Factor in scaffold or access equipment in your quote and timeline.
What are the common failures when skimming over poor surfaces?
Common failures include peeling or flaking skim, hairline cracking, and poor bonding. These result from inadequate surface preparation, untreated damp, painting over unsound substrates, or applying skim too thickly. Proper preparation and correct materials reduce the risk.
Should I plaster skirting and architraves or stop skimming at edges?
Finish edges neatly. For best results remove or mask skirting and architraves to achieve clean joins. In many jobs the tradesperson will float the skim up to the edge; in more detailed finishes they may remove trim and refit after work to ensure crisp lines.
How do environmental factors affect drying and finish quality?
High humidity and low temperatures slow drying and increase dusting risk. Strong winds or direct sun can cause rapid drying and cracking. Good ventilation, controlled indoor temperature and avoiding direct sunlight during curing improve results.
What should be confirmed in writing before starting the job?
Confirm the scope (skim only or full replaster), area in square metres, number of coats, materials and brands, access requirements, finishing standard, drying times, price breakdown (labour and materials), warranty terms and waste removal. Ask for a start date and estimated completion time.
Ready to compare?